Posted on

A Visit to the Aquarium

Fish, fish, everywhere fish!   There are lots of different types and colors and varieties, and other organisms besides fish, too.  How can your students learn some oceanography without getting bogged down in the diversity?

Here is a way to pull together a scientific study from a field trip to the aquarium!  This method will work great for a co-op field trip or homeschool group, just designate a team leader for the brainstorming sessions and post-briefing.

Students going into an aquarium should first learn about some of the general factors which affect all life in the oceans.  An excellent way to introduce these factors is by brainstorming them.

Many of the special characteristics of animals and plants in the water are already known to your students.  What students may not have is a framework, or system, to help them think of the habitat of the oceans as a whole.

Choose a topic or a set of topics to study.  The number of topics should depend upon your students, their ages and ability levels (not just reading level, but observational skills).  Topics which can help students pull the study together are:

  • Factors necessary for animal life at sea
  • Currents and tidal effects
  • Food chains
  • Functions of plants in water
  • Physical layout of the environment, etc.

This printable Aquarium Card will help your students pick out distinct facts which they will be able to use in discussion after the visit.

Brainstorming:

To brainstorm, the instructor should take time to talk and listen, then write down the ideas which come forth as a result of using leading questions.

A question like “What are some factors  necessary for life in the oceans?” is asked of the students.

For animals to survive at sea they must be able to catch their prey, defend themselves or stay away from predators,  recover from attack, and ensure the survival of some of their young.

More advanced answers may be:  maintain a good balance under water, go up or down at will, maintain the right salt balance in their tissues so that osmotic pressure does not kill them,  and find their mates in order to reproduce.

Another leading question might be: What do all animals in the sea have to do to eat?

Possible answers may be: Find the food, catch the food, identify food, process the food for digestion (biting, chewing, pulverizing, etc.), find the way back home, and many more.

What are some characteristics of the ocean environment?

The physical environment of the oceans consists of a lighted surface where the atmosphere and ocean meet, a surface where the ocean meets the ground beneath, many different surfaces at the edge of the water, the completely watery environment (called pelagic), tides, upwellings, and currents.  The limited number of environments allow the student to compare two or more of them without getting bogged down in detail.

What sorts of food chains exist in the ocean?

All food chains have certain elements:  A plant base which uses photosynthesis to make food, primary and secondary consumers, and decomposers.  Food chains usually have multiple elements like different types of plants, and many interchangeable consumers.  Food chains consist of more primary consumers than secondary consumers.  There are generally few large predators in an environment.  The use of food chains in ocean study also limits the range of topics to something manageable within the aquarium.

Do not stifle your children’s creativity, but encourage them to think of appropriate answers.  Your goal is to get the children to generalize.

The ideas you write down should be used in the pre-briefing, in the aquarium, and in the post-briefing to pull together the facts they learned at the aquarium.

Pre-briefing:

Print out the Aquarium Card onto cardstock for your students and have them write their names on the card.

Older students should bring a clipboard or notebook on which to record the answers.  Consider taking along a digital camera for their use as well.

For younger students, you may wish to tie the card on your child’s wrist by a ribbon or some yarn laced through a hole in the card.  Print or copy their version of the Aquarium Card (same file) onto colorful cardstock.  Your child can dictate answers to you as you go through the aquarium or write them in a notebook if they are old enough to do so.  If you use the digital camera to capture what they describe, it would make a fun and informative slideshow when you return.   Also,  iPhone voice memo, anyone?

Remember, before going to the aquarium discuss some of these concepts with your students so that they are prepared for the diversity of the aquarium.

In the aquarium:

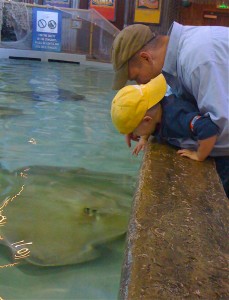
Petting a Stingray

Ask them to take a limited number of notes on the limited number of the topics you brainstormed with them.  Remember to keep the number of topics age-appropriate!  You should not try to take in all subjects in an aquarium!

Post-briefing:

After the visit, debrief the students.  Reinforce the topics your students researched by discussing them and by reporting on paper.

When your students finish their report, have them attach the notes they took both before and during the visit.  If you have a younger child doing this activity,  you could use their Aquarium Card and any photos in a lapbook report format.

Posted on 2 Comments

Experiment: Sand in the Kitchen

Sand

But everyone who hears these words of mine and does not put them into practice is like a foolish man who built his house on sand.  The rain came down, the streams rose, and the winds blew and beat against that house, and it fell with a great crash.  Matthew 7: 26-27

The Bible is clear about building upon sand.  It is not a good idea.  Houses built on a foundation of sand are not secure.  Some houses built on the beach have vanished without a trace after one day in a hurricane.  The sand is constantly shifting with the wind and wet and can offer little long term support.

You can do a demonstration in your kitchen (or better, out on the porch!) which will show the effects of the winds upon the sands.

One of the most common earth science experiments is the one in which the experimenter puts several sizes of dirt, stones, and sand into a jar with water.  After the jar is vigorously shaken, it is put down and the contents are observed.  What happens is that the solid material is laid down on the bottom of the jar in order of largest to smallest particle size.  This shows that water carries materials according to the energy it possesses.

Wind operates in a similar way.  The harder the wind blows, the more energy it possesses, and the larger the material it can carry.  Wind must have a great deal of energy of motion in order to carry solid things like rocks, but sand blows in the wind easily.

Materials:

  • large shallow pan
  • sand
  • small rocks
  • a small plant
  • dirt
  • a fan

Procedure:

  1. Place a line of materials across one end of the pan about two inches from the end.  These should be a clump of sand, one of dirt, a few little rocks, some fine little pebbles.
  2. Place the fan next to the pan facing into it.
  3. Turn the fan on low power and observe the results.
  4. Turn the fan on high power and observe.
  5. Draw a picture of the results at high power.

Another demonstration shows what happens at the beach when the wind blows.

Material:

Same as before.

Procedure:

  1. Place the dirt in a ridge about 4 inches from the end of the pan.  Put sand next to the dirt 3 inches from the end.
  2. Place the little plant in the dirt as if it were planted there.  Place the pebbles and rocks around the ridges.
  3. Place the fan at the end of the pan as shown.
  4. Turn the fan on high power and observe the results.  Notice especially the patterns the sand makes after being carried by the wind.  How do the objects affect this pattern?

In the above demonstration, you should be able to create some sand dunes.  In another related activity, you could mix up the dirt and sand before letting the fan blow.

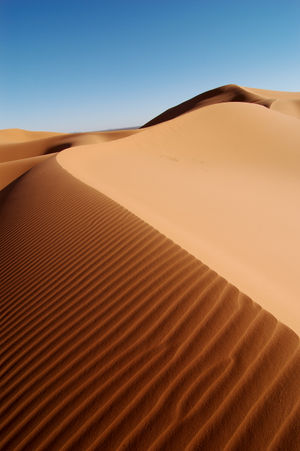
While the presence of dunes is characteristic of beaches, dunes in other places destroy the ecosystem in the area.  A subject for further research is the encroachment of the sand of the Sahara.  The Sand Dune National Mounument in the United States is another, smaller example of moving sand.  The effect of the wind and the denudation of the soils was graphically evident in the 1930’s on the plains of the United States.

You can use these topic areas to take your research to the library or internet and learn more about sand.  Have fun!

Posted on

Experiment: Salt Water and Heat Convection

In our series of experiments on the ocean, we’ve learned about Salt and Solubilities, the Density of Sea Water,  and Salt Water and Buoyancy.

Now we take a look at convection within salt water.

When we discuss heat transfer, we think of the three types: conduction, convection, and radiation.

Conduction takes place between two systems in contact with each other.

Convection occurs when heat is transferred by mass motion of molecules within a fluid.

Radiation is a form of heat transfer that occurs through electromagnetic wave propagation.  Usually we think of the rays of the sun as a major example of radiation.

All three types of heat transfer can be present simultaneously.  As you do this experiment on convection, see if you can also identify the other two types of heat transfer.

Materials:

  • food coloring
  • distilled water
  • salt
  • freezer tray for ice cubes
  • two glass jars

Procedure:

  1. Mix up some of the distilled water with a few drops of food coloring.
  2. Freeze this into cubes.
  3. Fill two glass jars 3/4 full with distilled water.
  4. Add some salt to one of the jars and label.
  5. Place a colored cube into each jar of water.  Observe the movement of the colored water as it melts into the warmer water.
  6. Leave the jars undisturbed as you watch.  Can you identify convection currents?  Where is the colored water going?  Is the colored cold water heavier or lighter than the warmer clear water?  Are the jars the same?  (Remember the Salt Water Density experiment..)
  7. Draw your jars, labeling them as to salt or fresh water.
  8. Write a conclusion statement about your finding.  Note: Yes, the presence of food coloring has affected your experiment, but please assume a small effect, and draw your own conclusions about the relative densities of these two solutions.  You can minimize the coloring effect by using a smaller amount of it.

Remember, as with all experiments, if you require your student to do a writeup, be sure to use the scientific method. Even if you do no writeup, as in the case of younger students, be sure to discuss the steps of the scientific method as you go.

Leave a comment and let us know what ocean experiments you have been doing!